Cleaning Your Gun
Every time you fire your gun, carbon, lead, copper, and plastic (if shooting a shotgun) residues are left in the barrel, chamber and action. This residue comes from the powder, wad, and bullets, and begins to build up after many rounds. Also, moisture from weather and sweat can cause corrosive rust to damage your gun’s metal parts. Fouling built up over time can impact your gun’s reliability. You’ll find that a dirty gun causes many malfunctions.
In other words, cleaning your firearm regularly is an important safety procedure as well as just good practice.
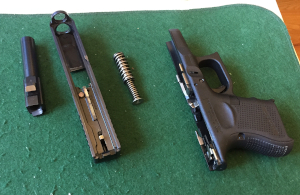
If you bought your firearm new, the owner’s manual that came with it should have instructions on cleaning. For older firearms, you may be able to find the manual on-line or from the manufacturer. There is also a great deal of information on the Internet to help you. I was completely amazed at myself (I am definitely hardware-impaired) the first time I disassembled and cleaned my Glock (and I did it successfully on the first try!) simply by following the instructions in the manual.
NRA Family has a good article describing preparation of your cleaning area, tools/equipment you may need, and the basics of the cleaning process. Surprisingly enough, wikiHow also has a fairly good set of instructions.
Preparation
- Prepare your area.

Preparing your area is an important part of cleaning. Use a work area that is well-lit and well-ventilated. Collect everything you need, including disposable gloves, solvent, lubricant, patches, rags, and cleaning kit.
Do not use your dining room table or any other surface that might be used for food preparation and/or serving. I have an old, beat-up folding table that I have appropriated for this purpose and it is not used for anything else. Also, notice my “high-tech” storage container (an old ice cream bucket).
I do highly recommend using disposable gloves when cleaning. There is no reason you should let either the lead and other residues or the solvents get all over your skin!
- Prepare your firearm.
The next step in the process is preparing your firearm to be cleaned. Always be sure your firearm is pointed in a safe direction! Be sure you have removed and emptied the magazine and cleared the chamber (for a semi-automatic) or emptied the cylinder (for a revolver). If you have extra magazines to be cleaned, empty them as well. Remove all ammunition from the room.

A semi-automatic may be disassembled to some extent for cleaning—check your owner’s manual.
Revolvers are usually not disassembled—again, check your owner’s manual.
Return to top
Cleaning a Semi-Automatic
Your owner’s manual should be your primary resource for cleaning. It will have step-by-step instructions.
There are also many online sources to walk you through the process of cleaning your semi-automatic handgun. Here are just a couple:
Return to top
Cleaning a Revolver
Your owner’s manual should be your primary resource for cleaning. It will have step-by-step instructions.
Again, there are many online sources to walk you through the process of cleaning your revolver. Here is one:
Return to top
How Often To Clean
All that being said, there are varying opinions about how often to clean. Some interesting articles discussing this include:
For what it’s worth, I shoot weekly and clean every other week. Because I do practice every week, I don’t fire a lot of rounds each time—especially with the current ammo situation. If I am out with friends I might shoot more rounds, or if I shoot something that I don’t use regularly, then I would clean each time.
Return to top


